


오후 4시30분 이전 주문건은 당일 발송
100,000원 이상 구매시 무료배송


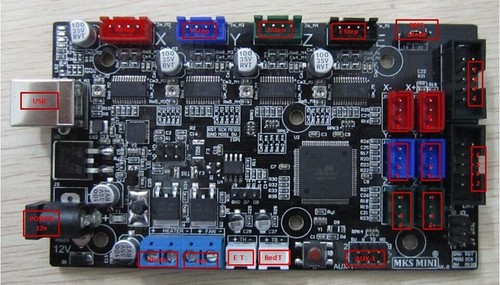
[P00000IC] 3D프린터 보드, MKS mini 
() 해외배송 가능
| 판매가 |

|
|---|---|
| 소비자가 | 22,000원 |
| 적립금 |
|
| 제휴 적립금 |
네이버 마일리지 적립
|
| 무이자할부 | |
| 제조사 | makerbase |
| 원산지 | 중국 makerbase |
| 국내/해외배송 | |
| SNS홍보 |   |
| 싸이월드 스크랩 |
|
| 배송비 | 3,000원 (100,000원 이상 구매 시 무료)"> |
|---|
| 상품명 | 상품수 | 가격 |
|---|---|---|
| 3D프린터 보드, MKS mini |


|
33000 ( |
| 총 상품금액(수량) : 0 (0개) | ||


상품상세정보
상품명: MKS mini
주문단위: MKS MINI 1개
주문전 주의사항
1. 모터드라이버 DRV8825가 PCB에 직접 납땜이되어 있어 고장시 교체가 어려움.
구매후, 보드 불량시에는 교환/반품이 안되니 신중하게 구매 바랍니다.
2. 보드에 사용되는 12V전원은 아답터형 잭이 부착되어 있음
(SMPS사용시는 전선을 이용해서 납땜을 해서 사용해야됨)
3. 히팅베드 구동을 지원하지 않음.
(단, MOSFET모듈을 별도로 달면 히팅베드 사용이 가능함)
4. 듀얼노즐을 지원하지 않음. 싱글노즐에서만 사용가능함.
Overview
MKS MINI is a feature all-in-one electronics solution for Reprap and
other CNC devices.It features an onboard ATmega2560.
It's four motor outputs are powered by DRV8825 stepper drivers.
Feasures
The board can use the same firmware as Ramps1.4.
The mounting hole locations is the same as Arduino Mega2560.
The power supply with 7805, more stable and reliable than the 1117,
but only supports 12V.USB to serial modules is 16U2, the same as
Arduino Mega2560.Without hot bed heating output, but has bed
thermal interface and bed control signal interface.
Features
- Arduino MEGA compatible Atmega2560 processors are compatible with all RAMPS class firmware
- Easy DISPLAY + SD-CARD connector,RepRapDiscount
- SmartController compatible pin header on board
- Firmware can use the same configuration as ramps1.4
- 2x temperature ADC connectors for thermistors
- 모터 드라이버 DRV8825 4개(X,Y,Z,압출기)가 PCB에 직접 납땜이 되어있음.
- DRV8825고장시 납땜으로 교체해야됨으로 어려울수 있음
- 2x PWM capable power mosfet outputs with voltage selector for MainPower.(Extruder0,Fans)
- 6x end stop connectors with power supply Xmin/Xmax/Ymin/Ymax/Zmin/Zmax
- 4 layers PCB, optimize heat dissipation.
- Recoverable fuse for short-circuit protection.
MKS MINI can easy use RepRapDiscount Smart Controller
and RepRapDiscount Full Graphic Smart Controller
You only need connect Smart Controller's Exp1 to MKS MINI's Exp1,S
mart Controller's Exp2 to MKS Base's Exp2.
Firmware
This section will show you how to get firmware into your controller and run
it with basic settings.Software required: Arduino IDE, Choice of firmware
( Marlin or Repetier or Sprinter ), Pronterface
1.The VCP drivers will install a COM Port on your computer for the MKS MINI,
you can check what port number was assigned by going to your device manager
and click on Ports(COM & LPT) look for something that says "USB Serial Port(COM3)"
where COM3 is you assigned port number(will vary from PC to PC). Remember
this number as you will be using it later in configuring other software.
2. Install Arduino IDE - Download and extract the Arduino IDE .
3. Get your firmware - While you can use most firmwares out there, we will use
Marlin as an example. Download and extract Marlin or any other forks of the
firmware that you prefer/need.
4. Upload firmware - Run the Arduino IDE (arduino.exe).
Select your board - Click on Tools -->Board -->Arduino Mega 2560,
Select your serial port - Click on Tools-->Serial Port-->(select your COM
port for the X3 USB, you can check this in Device manager)
On Arduino click File-->Open -- then point to your Marlin Download and
select Marlin.pde. With Marlin loaded on the IDE window, click on the
tab that says "configuration.h". These are the basic entries that you
need to change to get the X3 working.
#define BAUDRATE 250000 //This will work fine for the MKS Gen
#define MOTHERBOARD 33 //33 is for RAMPS which the MKS GEN is compatible with MOTHERBOARD 34
#define TEMP_SENSOR_0 3 //If you have the NTC 100K
#define TEMP_SENSOR_1 0
#define TEMP_SENSOR_2 0
#define TEMP_SENSOR_BED 0 //If you have the NTC 100K
These entries are the only ones you need just to get the MKS Gen running.
Once you get it to upload you can now test most features of the board.
You will need to tweak the settings on the configuration file for your printer.
5. Upload(or compile to test) Marlin - While still on the Arduino window
Click on the Triangle inside the circle to do a test compile, this makes sure
that the firmware does not contain errors( you can skip this)
Click on the arrow pointing to the right inside a square frame to upload firmware
to the board. If everything goes well you'll see a "Done Uploading" message
near the bottom of the Arduino window.
상품결제정보
무통장 입금은 상품 구매 대금은 PC뱅킹, 인터넷뱅킹, 텔레뱅킹 혹은 가까운 은행에서 직접 입금하시면 됩니다.
주문시 입력한 입금자명과 실제입금자의 성명이 반드시 일치하여야 하며, 7일 이내로 입금을 하셔야 하며 입금되지 않은 주문은 자동취소 됩니다.
배송 정보
- 배송 방법 : 택배
- 배송 지역 : 전국지역
- 배송 비용 : 3,000원
- 배송 기간 : 1일 ~ 4일
- 배송 안내 : - 산간벽지나 도서지방은 별도의 추가금액을 지불하셔야 하는 경우가 있습니다.
고객님께서 주문하신 상품은 입금 확인후 배송해 드립니다. 다만, 상품종류에 따라서 상품의 배송이 다소 지연될 수 있습니다.
교환 및 반품 정보
- 상품을 공급 받으신 날로부터 7일이내 단, 가전제품의
경우 포장을 개봉하였거나 포장이 훼손되어 상품가치가 상실된 경우에는 교환/반품이 불가능합니다.
- 공급받으신 상품 및 용역의 내용이 표시.광고 내용과
다르거나 다르게 이행된 경우에는 공급받은 날로부터 3월이내, 그사실을 알게 된 날로부터 30일이내
교환 및 반품이 불가능한 경우
- 고객님의 책임 있는 사유로 상품등이 멸실 또는 훼손된 경우. 단, 상품의 내용을 확인하기 위하여
포장 등을 훼손한 경우는 제외
- 포장을 개봉하였거나 포장이 훼손되어 상품가치가 상실된 경우
(예 : 가전제품, 식품, 음반 등, 단 액정화면이 부착된 노트북, LCD모니터, 디지털 카메라 등의 불량화소에
따른 반품/교환은 제조사 기준에 따릅니다.)
- 고객님의 사용 또는 일부 소비에 의하여 상품의 가치가 현저히 감소한 경우 단, 화장품등의 경우 시용제품을
제공한 경우에 한 합니다.
- 시간의 경과에 의하여 재판매가 곤란할 정도로 상품등의 가치가 현저히 감소한 경우
- 복제가 가능한 상품등의 포장을 훼손한 경우
(자세한 내용은 고객만족센터 1:1 E-MAIL상담을 이용해 주시기 바랍니다.)
※ 고객님의 마음이 바뀌어 교환, 반품을 하실 경우 상품반송 비용은 고객님께서 부담하셔야 합니다.
(색상 교환, 사이즈 교환 등 포함)
상품 사용 후기